Hi!
I case you haven't noticed, I don't blog here anymore. I am officially self hosted on my schmancy new Wordpress site! So I am setting up (or trying) a redirect so whenever you type in this address, you end up over there. See you there!
Enjoy!
-Kelly M.
Tuesday, August 2, 2011
Saturday, July 23, 2011
How to Make Kale Chips
I may never eat potato chips again.
Why do these taste so good? They're green.
I've been wanting to make these for awhile, but most recipes just say something like this:
Spritz with olive oil spray and bake at 400F until crispy.
That's it? That can't be it. That's not a recipe, it's not even a complete sentence. How am I supposed out make a dish off of that?
So I didn't. My life was kale-less until I made these, and frankly, I'm not sure how I made it this long.
So when I found the most in depth kale chip recipe I had seen so far from Kath, I decided to give it a go.
Now, my dear readers, behold the most descriptive, picture filled kale chips recipe you may ever find.
Ever.
Kale Chips
Note: You can season these however you like. You can use cheese, chives, salt, pepper, garlic, cayenee, oregano, whatever you like! The possibilities go and on. It al depends on your tase buds, if you like sour cream and onion chips, salt snd vinegar chips, cheesey, chips, spicy chips, barbecue chips, or just good ol' salt.
Ingredients
One bunch of kale (You can use multiple bunches if you want more chips.)
Olive oil nontcik spray (I think a Misto would work really well with this)
Whatever seasoning you want (see note)
I used salt and onion powder
 Tear the stem off of the bottom of the kale like so. Now, tear off the leafy part off the stem. You can make them almost any size you want; your guest won't care how good they look. They'll be too busy trying to figure out how these taste so good.
But you may want to try to make them somewhat similar sizes for the sake of even cooking.
 Place them on a baking sheet and bake them at 400F for about 10 minutes. (Keep a pretty keen eye on them, no one wants over or under done kale chips.)
 Preseneting... CRISPY KALE CHIPS!!!!!!!!
They may not look like much in this picture, but kale is not overly photogenic. (No offense, kale.)
Don't be decieved, these are amazingly amazing. I said amazing twice.
Please try these. I dare you.
Enjoy!
-Kelly M.
Why do these taste so good? They're green.
I've been wanting to make these for awhile, but most recipes just say something like this:
Spritz with olive oil spray and bake at 400F until crispy.
That's it? That can't be it. That's not a recipe, it's not even a complete sentence. How am I supposed out make a dish off of that?
So I didn't. My life was kale-less until I made these, and frankly, I'm not sure how I made it this long.
So when I found the most in depth kale chip recipe I had seen so far from Kath, I decided to give it a go.
Now, my dear readers, behold the most descriptive, picture filled kale chips recipe you may ever find.
Ever.
Kale Chips
Note: You can season these however you like. You can use cheese, chives, salt, pepper, garlic, cayenee, oregano, whatever you like! The possibilities go and on. It al depends on your tase buds, if you like sour cream and onion chips, salt snd vinegar chips, cheesey, chips, spicy chips, barbecue chips, or just good ol' salt.
Ingredients
One bunch of kale (You can use multiple bunches if you want more chips.)
Olive oil nontcik spray (I think a Misto would work really well with this)
Whatever seasoning you want (see note)
I used salt and onion powder

But you may want to try to make them somewhat similar sizes for the sake of even cooking.


They may not look like much in this picture, but kale is not overly photogenic. (No offense, kale.)
Don't be decieved, these are amazingly amazing. I said amazing twice.
Please try these. I dare you.
Enjoy!
-Kelly M.
Thursday, July 21, 2011
How to Make Cheese Stuffed Meatballs
Good evening, friends!
I've been thinking, and I really want to thank you all for reading my blog. It's still in its preliminary stages, and it's so heartwarming to say I have such wonderful readers in the beginning. It means so much to me that you take the time out of your busy lives to read my fiascoes, and I am very grateful. Thank you.
So I was also thinking about how nice a community the blogging community is. Have you heard of the The Great Fundraising Act? It's to support a brilliant blogger named Susan, who has recently been diagnosed with Lymphoma. The blogging community is coming together to help pay her medical bills, because she obviously can't work while she's in the hospital having chemo, but she is still blogging.
Susan seems like a lovely person, and this whole story really hits home for me because of my mom's recent diagnosis with stage 2 breast cancer. The auction is taking place this Monday, July 25th, so maybe you'll stop by?
Dear Susan, I send my love and best wishes to you. And if I had a product or a cookbook I was selling, I would donate it to the auction. (Although I wouldn't mind publishing a cookbook one day ;) )
So speaking of meatballs (which I wasn't,) here is a delicious and beyond recipe I made for dinner a few days ago. It's flavorful meat stuffed with gooey, melt-y cheese!
Are you drooling yet? I am.
Cheese Stuffed Meatballs
Note: You can use whatever cheese you want, or whatever cheese you have on hand. This recipe is also very easily halved, doubled, etc. to fit your needs. The amount of cheese is an approximate, I didn't weigh it our or anything. This is very simple, and very good, so just have fun!
Ingredients
12 oz. extra lean ground turkey (That's what I used, but you can use lean or however you like.)
1T onion powder
2t bottled garlic (I like stuff garlicky, so feel free to use less and/or actual cloves of garlic)
dash of salt
dash of pepper
About 2-3 oz. cheese of choice (see note)


 Let the meatballs sit for a bit or until the bottom browns slightly.
 Then turn them over and do the same ting with the other side. Once that side browns, just keep rolling them around until the balls are browned and crispy all over. Maybe I should've boiled them or something else to get them to cook more evenly, but this really did get the job done and rolling balls around in a hot skillet is actually quite fun. :)
 Meanwhile, I swiped to raw balls and baked them in cover ed dish at 450F for experimental purposes.
 Here are my balls, all yummy, oozy, crispy, and done.
 So I baked them for about 30 minutes or until they turned pinkish like this. The verdict ruled in favor of the non-baked ones, because the baked balls lacked a crispy crust like the skillet done ones did. But these were still very, very yummy. Remember when I said I baked two?

I've been thinking, and I really want to thank you all for reading my blog. It's still in its preliminary stages, and it's so heartwarming to say I have such wonderful readers in the beginning. It means so much to me that you take the time out of your busy lives to read my fiascoes, and I am very grateful. Thank you.
So I was also thinking about how nice a community the blogging community is. Have you heard of the The Great Fundraising Act? It's to support a brilliant blogger named Susan, who has recently been diagnosed with Lymphoma. The blogging community is coming together to help pay her medical bills, because she obviously can't work while she's in the hospital having chemo, but she is still blogging.
Susan seems like a lovely person, and this whole story really hits home for me because of my mom's recent diagnosis with stage 2 breast cancer. The auction is taking place this Monday, July 25th, so maybe you'll stop by?
Dear Susan, I send my love and best wishes to you. And if I had a product or a cookbook I was selling, I would donate it to the auction. (Although I wouldn't mind publishing a cookbook one day ;) )
So speaking of meatballs (which I wasn't,) here is a delicious and beyond recipe I made for dinner a few days ago. It's flavorful meat stuffed with gooey, melt-y cheese!
Are you drooling yet? I am.
Cheese Stuffed Meatballs
Note: You can use whatever cheese you want, or whatever cheese you have on hand. This recipe is also very easily halved, doubled, etc. to fit your needs. The amount of cheese is an approximate, I didn't weigh it our or anything. This is very simple, and very good, so just have fun!
Ingredients
12 oz. extra lean ground turkey (That's what I used, but you can use lean or however you like.)
1T onion powder
2t bottled garlic (I like stuff garlicky, so feel free to use less and/or actual cloves of garlic)
dash of salt
dash of pepper
About 2-3 oz. cheese of choice (see note)

Mix together all ingredients except cheese in a medium-large bowl. (Meat, onion powder, garlic, salt, pepper)

I used 1 wedge of Light Laughing Cow cheese, and some Light Havarti cheese.

So take a little bit of meat (take as much as you like depending on how big you want the meatballs,) squish it into a flat circle, and plop some cheese in the center.

I did the same thing with the Havarti.

Take the meat and pinch it around the cheese, and roll it around until it turns into a ball.

Load 'em up in a large pot or skillet sprayed with nonstick spray or a Misto, but just don't overcrowd them too much. Bring it to medium-high heat.


Served with class in a mug with a fork. Meatballs in a mug? I should write that down.
Enjoy!
-Kelly M.
Monday, July 18, 2011
How to Make Homemade Strawberry Jam
I am on a quest.
I am on a quest for the best pb & j ever.
To Do List:
1. Make awesome bread
2. Make awesome peanut butter
3. Make awesome jam
One down; two to go. (And yes, this jam really is awesome.)
What's really nice about this jam is that there is only one ingredient; strawberries. I added balsamic vinegar at the end because I like the combo of strawberries and balsamic so I thought that would put this over the top for me. It's just a personal preference, feel free to leave it out. Other than that, no sugar, no pectin, no unpronounceable artificial stuff, not even salt. This is true to the berries.
Homemade Strawberry Jam
Note: I'm think this would work with most berries. I already tried blueberry jam, so I'm pretty sure it would work.
Ingredients
3 baskets of strawberries, hulled and quartered (see note)
balsamic vinegar
 Put all your berries in a nice big pot. I sprayed it with nonstick spray for the sake of taking precautions, and I don't think it'll hurt.
 Mash the berries with a potato masher until the berries are nice, juicy, and jam-y. (Remember when I used a food processor last time? I didn't want to clean it, so I just didn't use it. I don't think it made it worse or anything, but if you have the overwhelming urge to scrum berry residue off a food processor, have fun!)
 Bring it to a boil...
 ...and keep it there...
 ...until it's nice and thick like this.
 Like I said above, I added balsamic vinegar at the end. If yo don't want to (or just don't have any,) then you can skip this. Easy, right?
So if you did add the vinegar, just heat the jam back up and stir t around for a bit until everything's nice and combined. Yeah, I probably didn't need to turn the heat off, but I would love to hear your feedback if any of you make this.
 So I tried it, and it was good. Very good.
But something with the consistency was off, so I whipped out my trust immersion blender (I have a Cuisinart, but I'm not sure what model it is) and whirled away.
 Look at how smooth that is!
 So this filled a bit more than one 5 oz. jar, so I guessing it makes about 8 oz.
This jam is so natural and lovely. I'm not sure I've ever tasted better. And it was so easy!
Enjoy!
-Kelly M.
I am on a quest for the best pb & j ever.
To Do List:
1. Make awesome bread
2. Make awesome peanut butter
3. Make awesome jam
One down; two to go. (And yes, this jam really is awesome.)
What's really nice about this jam is that there is only one ingredient; strawberries. I added balsamic vinegar at the end because I like the combo of strawberries and balsamic so I thought that would put this over the top for me. It's just a personal preference, feel free to leave it out. Other than that, no sugar, no pectin, no unpronounceable artificial stuff, not even salt. This is true to the berries.
Homemade Strawberry Jam
Note: I'm think this would work with most berries. I already tried blueberry jam, so I'm pretty sure it would work.
Ingredients
3 baskets of strawberries, hulled and quartered (see note)
balsamic vinegar


So if you did add the vinegar, just heat the jam back up and stir t around for a bit until everything's nice and combined. Yeah, I probably didn't need to turn the heat off, but I would love to hear your feedback if any of you make this.

But something with the consistency was off, so I whipped out my trust immersion blender (I have a Cuisinart, but I'm not sure what model it is) and whirled away.


This jam is so natural and lovely. I'm not sure I've ever tasted better. And it was so easy!
Enjoy!
-Kelly M.
Thursday, July 14, 2011
How to Make Chocolate (or pb) Chip Cookies
Nom nom nom...
Right here, I would normally try to come up with a witty explanation that expresses how amazing these scookies are. But I'm too busy thinking about their sweet, buttery goodness.
They're a cross between your favorite childhood chocolate chip cookies and buttery scones.
Isn't that explanation enough?
I say this because I care about all of you. Go make these now. (Actually, wait for the recipe and then go make these.)
Melt-in-Your-Mouth Chocolate Chip Scookies
Yields about 32 cookies
Adapted from Cooking Light and Joy of Baking
Ingredients
1/2 cup (1 stick) butter
1/2 cup stevia/sugar blend
1 3/4 cup all purpose flour
1/2 cup whole wheat flour
1t baking soda
1/2t salt
1t vanilla extract (I didn't have any, so I used almond extract and it worked really well)
1/4-1 c chocolate chips of choice (depending on how chip-y you like it, see below for what I used)
1/2c unsweetened almond milk
Preheat oven to 350 degrees F.
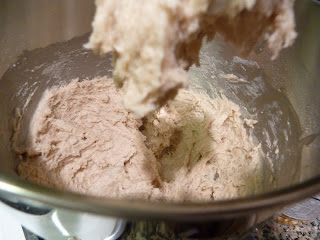
In the bowl of a mixer (a large bowl if using a hand mixer) beat butter until pretty smooth.
 Add stevia/sugar blend and cream until fluffy.
 Add extract.
 Beat until Incorporated.
 Meanwhile, put flours, baking soda, and salt in a bowl...
 ...and mix until thoroughly combined.
 When I added the dry mixture to the wet mixture, there was way too much dry and it got all crumbly.
 So I added the 1/2c almond milk, and we were back in business.
 Add the chips. I only had peanut butter chips on hand, so that's what I used. They'd probably work better with chocolate chips like they were intended to, but the Pb chips were reeeeeaaaaally good too. ;)
 Stir on low speed just until the chips are distributed. (Lick the beater. ;) )
 Spray a cookie sheet with nonstick spray, line with parchment paper, and spray again with nonstick spray. (I really don't want these to stick.)
 Stick them in the oven and bake for about 20 minutes, but my oven is pretty weird, so just be vigilant. When I baked them, they really didn't spread out very much, but they actually puffed up instead. Huh.
 So I had to do them in two batches,

Right here, I would normally try to come up with a witty explanation that expresses how amazing these scookies are. But I'm too busy thinking about their sweet, buttery goodness.
They're a cross between your favorite childhood chocolate chip cookies and buttery scones.
Isn't that explanation enough?
I say this because I care about all of you. Go make these now. (Actually, wait for the recipe and then go make these.)
Melt-in-Your-Mouth Chocolate Chip Scookies
Yields about 32 cookies
Adapted from Cooking Light and Joy of Baking
Ingredients
1/2 cup (1 stick) butter
1/2 cup stevia/sugar blend
1 3/4 cup all purpose flour
1/2 cup whole wheat flour
1t baking soda
1/2t salt
1t vanilla extract (I didn't have any, so I used almond extract and it worked really well)
1/4-1 c chocolate chips of choice (depending on how chip-y you like it, see below for what I used)
1/2c unsweetened almond milk
Preheat oven to 350 degrees F.
In the bowl of a mixer (a large bowl if using a hand mixer) beat butter until pretty smooth.


so this time I flattened them with a fork, and they baked much better. They still puffed up, but no as much.
They taste like cookies, they pretty much are cookies, but they kinda look like scones, and their texture is somewhat similar to scones, so ta da! We have sconies.
So, no, I don't have a picture of the second batch. Like I said, they were really good, and a picture just didn't happen. *Lick fingers* ;)
OK, you've got the recipe. Now you can go make these.
Enjoy!
-Kelly M.
How to make Stevia/Sugar Blend
OK guys, this one is very simple.
I love baking, but not all the sugar, butter, etc. that goes along with it. "Light" baking is interesting.
Baking is a science. Light baking is different.
Scary different.
I love stevia, but I find using it in baked goods makes the finished product taste diet-y, which can be a living nightmare. I am not on a diet, nor do I encourage diets. I hate "diet food" and do not believe it should ever be consumed by anyone. Ever.
So I made brownies today with stevia, and when I tested them on my mom, she was less than enthusiastic. She gave them a "oh they're nice, sweetie" review which just won't cut it for me. When I pressed her further, (sorry mom!) she said they're good for diet food.
I tried (unsuccessfully) to keep my horrified reaction on the inside.
Diet food? I don't make diet food. Ew.
So I sucked up my pride, and bought some real, raw cane sugar. (Hey, if I'm going to eat real sugar, it should at least be the minimally processed stuff.)
So I kinda chickened out. Instead of using total real sugar, I mixed it in a 1:1 ratio with the stevia.
So it worked a lot better than using stevia alone. I have a feeling this mix is going to go much farther than stevia has gone before, and will probably end up in recipes to come. I'll post the recipe for the cookies I made with the mix soon.
Stevia/Sugar Mix
Ingredients
1/4 cup stevia
1/4 cup raw cane sugar
Combine both ingredients in a bowl and mix well. (Simple, huh?)
 So like I said, I'll be back with my first stevia/sugar mix cookies recipe tomorrow.
Can you handle the suspense?
Enjoy!
-Kelly M.
I love baking, but not all the sugar, butter, etc. that goes along with it. "Light" baking is interesting.
Baking is a science. Light baking is different.
Scary different.
I love stevia, but I find using it in baked goods makes the finished product taste diet-y, which can be a living nightmare. I am not on a diet, nor do I encourage diets. I hate "diet food" and do not believe it should ever be consumed by anyone. Ever.
So I made brownies today with stevia, and when I tested them on my mom, she was less than enthusiastic. She gave them a "oh they're nice, sweetie" review which just won't cut it for me. When I pressed her further, (sorry mom!) she said they're good for diet food.
I tried (unsuccessfully) to keep my horrified reaction on the inside.
Diet food? I don't make diet food. Ew.
So I sucked up my pride, and bought some real, raw cane sugar. (Hey, if I'm going to eat real sugar, it should at least be the minimally processed stuff.)
So I kinda chickened out. Instead of using total real sugar, I mixed it in a 1:1 ratio with the stevia.
So it worked a lot better than using stevia alone. I have a feeling this mix is going to go much farther than stevia has gone before, and will probably end up in recipes to come. I'll post the recipe for the cookies I made with the mix soon.
Stevia/Sugar Mix
Ingredients
1/4 cup stevia
1/4 cup raw cane sugar
Combine both ingredients in a bowl and mix well. (Simple, huh?)

Can you handle the suspense?
Enjoy!
-Kelly M.
Saturday, July 9, 2011
Firework(s)
Hey all!


 Fail. (On my part ;) )


 Nice, huh?
I'm no Ashley with a camera, but these are pretty good pics. Yes, this is the Hollywood Bowl.
No, I'm really not talking about food in this post, am I?
Here's my rationalization; it took valuable blogging time to upload all these pictures. Even if you don't like my reasoning, (But why?) it's my story and I'm sticking to it. So yeah.
Enjoy!
-Kelly M.
Sorry I have been out if it lately, I'm still back at the ranch (literally.)
Remember the concert I was talking about last post?
Check out these pics I took!
 |


I'm no Ashley with a camera, but these are pretty good pics. Yes, this is the Hollywood Bowl.
No, I'm really not talking about food in this post, am I?
Here's my rationalization; it took valuable blogging time to upload all these pictures. Even if you don't like my reasoning, (But why?) it's my story and I'm sticking to it. So yeah.
Enjoy!
-Kelly M.
Subscribe to:
Posts (Atom)